|
|
Customizing Your Store
Accessing your Store Control Panel
You can go to the Facebook App and click on Administer Store to perform all actions relative to your online store. Use this button and process to administer your catalog, your store, view your store, review orders, or change products. You can also administer and view your store a number of other different ways as well; however, this provides you an easy to remember single point of entry.
SalesCart has two different versions of its app that runs on Facebook. When you customers go to your Store tab, they will only see your store and the products you sell. They won't see the store creation and administration functionality that you can see in Facebook.
The SalesCart cloud control panel interface is very intuitive and once your store is complete, it will take some time to look around and become fully acquainted with it. The main items you are going to want to do right away is 1) Update your departments (highest level of categories) and categories for your products ; 2) Update your products; and 3) Update attributes you have on any products. This is covered next.
Overview of Store Control Panel Controls
| What you are doing | Instructions | |
|---|---|---|
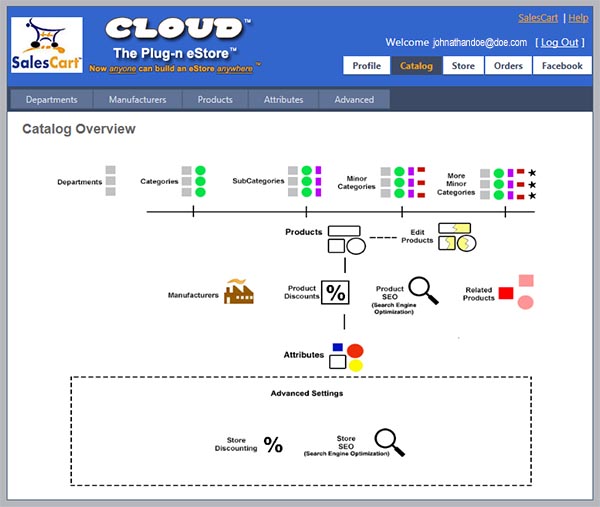 Click Here for Larger Image |
Basics of SalesCart Cloud Administrative Control Panel
|
Customizing your Category and Product Data
By default, a demo-data store is created. You must customize that demo data for your own store and product. The following video describes the process you should follow. In this video, we completely customize and change the default store data to a bakery in 8 minutes.
Setup your Workspace first
Open your browser and create three different tabs. In the first, tab, place the YouTube video. In the second tab, have the SalesCart Control Panel. In the third tab, have your Facebook Store. You should watch the video and pause the video at each step. Then go to the second tab and perform thet exact same operation in the video screen. Once you have succesfully finished each section of the video, the video will prompt you to refresh your store. You will go to your third browser tab and hit the F5 button in your browser to refresh the screen and display the store changes you just made. Follow this process first for the Department and Categories, next for the Product and finally for the Attributes (and Options).
We suggest you watch the video all the way through once, then turn the sound down on the video, and go screen by screen
 Watch Video: Category and Product Customization
Finalizing Facebook and PayPal
The final steps are to finalize your Facebook Page to ensure the Click-to-Shop button is always displayed and to allow mobile customers to shop your store as well. You will also configure PayPal so that it can accept orders from SalesCart.

 Reddit